
Taking your WooCommerce store global can unlock incredible growth opportunities. However, setting up accurate and efficient WooCommerce International Shipping for international customers requires careful planning.
This is where WooCommerce shipping zones come in. These zones allow you to set up tailored shipping methods for different regions, ensuring fair pricing and smooth deliveries.
Have you ever needed to adjust how country names appear in your store? Perhaps you want to use shorter country codes, display names in a different language for clarity, or refine the checkout experience by offering specific shipping options based on location. If you need to adjust how country names appear in your store—whether you want to use shorter country codes or display names in a different language—you can easily rename country codes in WooCommerce. This can help create a more user-friendly experience for customers and align your shipping setup with your business needs.
In this guide, we’ll take you through the steps to create and manage shipping zones effectively. You’ll learn how to set shipping rates, streamline delivery options, and enhance the shopping experience for customers around the world. Whether you’re launching international shipping for the first time or improving your current setup, this guide will help you optimize the process!
Understanding Shipping Zones in WooCommerce
Imagine your e-commerce store as a global network of destinations. Shipping zones act as the blueprint that helps you organize and manage shipping rates and delivery methods for different locations. In WooCommerce, a shipping zone is a defined geographical area where specific shipping rules apply.
These zones can range from broad regions like an entire continent to highly specific locations such as individual countries, states, or postal codes. This flexibility enables you to set up shipping policies that align with your business operations and customer locations.
For example, you might establish:
- A domestic shipping zone for deliveries within your own country.
- A regional shipping zone covering nearby countries.
- An international shipping zone for customers worldwide.
Each zone can have unique shipping rates and delivery methods, ensuring customers receive transparent and accurate shipping costs at checkout.
The Importance of WooCommerce International Shipping Zones
Shipping zones are more than just a way to categorize locations—they’re a powerful tool for optimizing your WooCommerce shipping strategy. Here’s why they matter:
1. Tailored Shipping Rates
Shipping costs can vary significantly based on location. Shipping zones allow you to set precise rates that reflect the actual costs of delivering to each region, ensuring both you and your customers receive fair pricing.
2. Currency-Specific Pricing
If you sell internationally, you can refine pricing further by setting shipping rates in different currencies. For example, you could charge €10 for European customers, $12 for those in the U.S., and £9 for UK shoppers—all within the same zone. This level of customization enhances pricing accuracy and customer trust.
To simplify this process and ensure automatic currency conversion, you can use the Aelia Currency Switcher for WooCommerce. This tool detects customer locations and displays prices in their local currency, making transactions more seamless.
3. Location-Based Shipping Methods
Not every shipping option is available worldwide. With shipping zones, you can offer the most relevant methods to each region. For instance, domestic customers might have access to express shipping, while international buyers only see standard shipping options.
4. A Smoother Checkout Experience
Displaying only applicable shipping methods at checkout streamlines the purchasing process. Customers won’t be confused by unavailable options, reducing cart abandonment and increasing conversion rates.
5. Simplified International Shipping
Expanding to global markets brings logistical challenges. Shipping zones help you organize different shipping policies for various countries, making it easier to comply with regulations, customs fees, and delivery restrictions.
By carefully configuring and refining your shipping zones, you’ll create a professional, efficient, and customer-friendly shipping experience—one that supports both business growth and customer satisfaction.
How to Create Shipping Zones in WooCommerce
#1 – Access Shipping Zones:
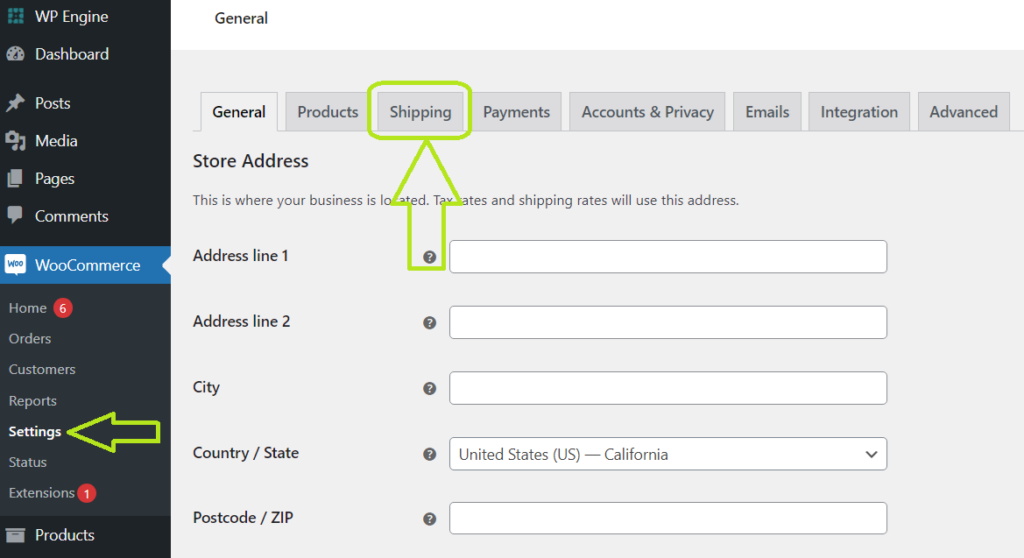
- Start by logging into your WordPress dashboard. In the left sidebar, hover over WooCommerce and click on Settings.
- From the tabs at the top, select Shipping. This will take you to the main shipping settings page.
- Click on the Shipping Zones tab to access the zone management area.
#2 – Add a New Zone:
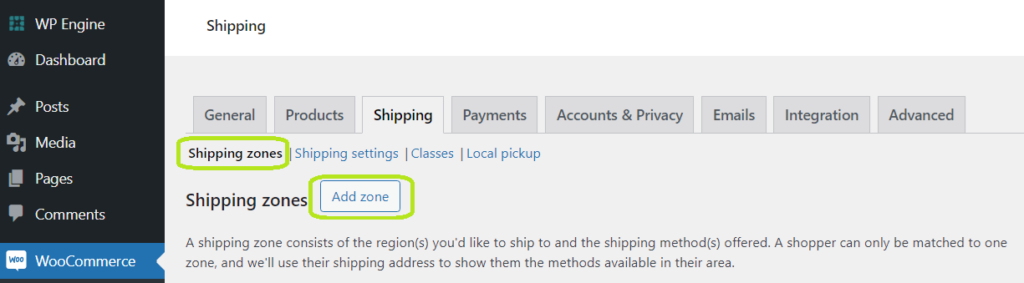
- On the Shipping Zones page, click the Add shipping zone button at the top.
- You’ll be presented with a new screen where you can configure your zone.
#3 – Define Zone Regions:
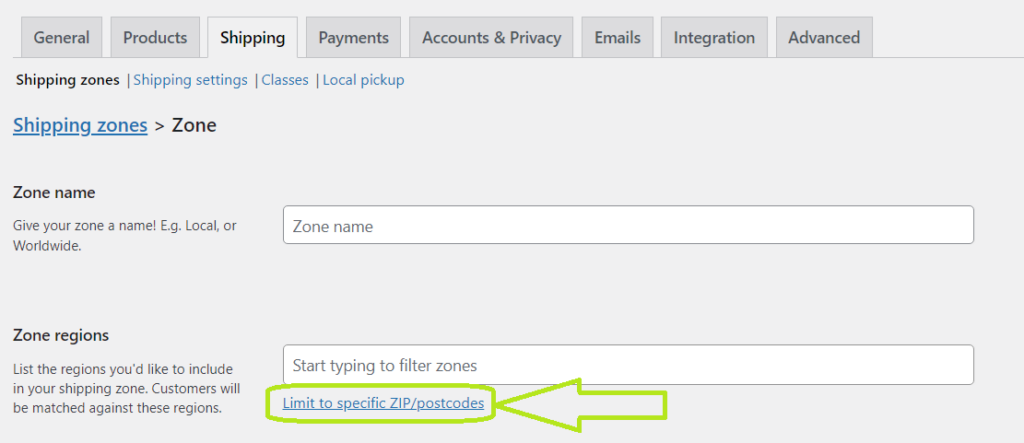
- Enter a Zone name that clearly describes the geographical area you’re targeting (e.g., “North America,” “Europe,” “Domestic”).
- Under Zone regions, start typing the name of the country, continent, or region you want to include. WooCommerce will suggest options as you type. You can select multiple regions to include in this zone.

#4 – Limit to Specific Postal Codes (Optional):
- If you want to narrow down the zone further, click on the Limit to specific zip/postcodes link.
- Enter the specific postal codes or zip codes, one per line, that you want to include in this zone. You can also use wildcards (e.g., 902*) to match a range of codes.
#5 – Add Shipping Methods:
- Click the Add shipping method button to choose the shipping options you want to offer for this zone.

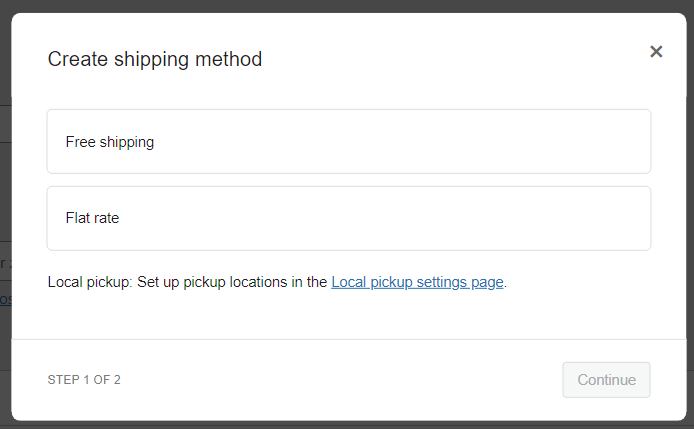
- WooCommerce provides built-in options like Flat Rate, Free Shipping, and Local Pickup. If you have installed shipping plugins, you’ll see additional methods available.
- For each method, click Add shipping method, then configure the settings as needed.
| Pro Tip: If you’re using a tax adjustment plugin like the Aelia Tax Display by Country for WooCommerce, you can take advantage of its ability to automatically adjust tax visibility based on the customer’s location. This ensures accurate tax calculations and compliance with international tax regulations, making your pricing more transparent and customer-friendly. |
#6 – Save Changes:
- Once you’ve configured your shipping methods, click Save changes to finalize your new shipping zone.

Best Practices and Tips
Getting your shipping zones set up correctly is key to running an efficient and profitable WooCommerce store. Here are some best practices to ensure smooth operations and optimal customer satisfaction:
1. Start Broad, Then Get Specific
Instead of setting up highly specific shipping zones from the start, begin with broader regions such as entire continents (e.g., “North America”, “Europe”, “Asia”). Then, refine these by adding more specific zones for individual countries or even states where necessary.
For example:
- A general “Europe” shipping zone can cover multiple countries with standard shipping rates.
- A separate “United Kingdom” zone within Europe allows for tailored shipping options like express delivery.
This approach keeps your shipping setup organized while allowing flexibility for different regions.
2. Use Flat Rates and Free Shipping Strategically
Flat-rate shipping can simplify your pricing structure and set clear expectations for customers. If offering free shipping, consider:
- Minimum Order Value – Encourage larger purchases by offering free shipping on orders above a certain amount.
- Specific Products – Offer free shipping on lightweight or high-margin products.
- Limited-Time Promotions – Use free shipping as an incentive during seasonal sales or special events.
3. Offer Location-Based Shipping Methods
Not all shipping options are suitable for every region. Tailor shipping methods based on location to avoid confusion at checkout:
- Domestic zones – Provide multiple options like standard, express, or same-day delivery.
- International zones – Offer reliable services such as DHL, FedEx, or UPS, while clearly displaying expected delivery times.
4. Test Your Shipping Setup Regularly
Shipping configurations can sometimes break due to plugin updates, new shipping carriers, or changing rates. Regularly test:
- The checkout process with different addresses to ensure correct shipping rates apply.
- The accuracy of tax calculations for international customers.
- Any special shipping rules, such as free shipping thresholds, to confirm they work as expected.
5. Keep Customers Informed with Clear Shipping Policies
Transparency is key when it comes to shipping. Ensure your policies clearly outline:
- Your return and refund policies related to shipping delays or lost packages.
- Estimated delivery times for each shipping method.
- Any additional customs fees or taxes for international orders.
Additional Factors to Consider for International Shipping
While shipping zones are a fantastic way to streamline logistics, there are several other important aspects to consider when expanding your store to international markets. These factors will ensure that your shipping setup is both effective and customer-friendly.
Shipping Zones vs. Shipping Methods: The Key Difference
Shipping zones define where you ship, while shipping methods define how you ship. Both elements need to be configured carefully for a seamless experience. For example, you may have a “Europe” shipping zone but offer various shipping methods within it, such as standard, express, or economy. Offering different shipping methods helps cater to a wider range of customer needs and budgets.
Consider the following:
- Shipping Zones: Regions where your products are eligible for shipping (i.e., countries, states, or specific postal codes).
- Shipping Methods: Options available within each shipping zone, which may vary based on service level, speed, or cost.
Navigating International Shipping Challenges
Expanding your store globally comes with its own set of challenges. Here are some common hurdles to be aware of:
1. Customs and Duties
It’s essential to familiarize yourself with customs regulations and duty charges for each country you ship to. These additional costs can significantly impact your customers’ total price, and should therefore be included in your checkout or product pricing to avoid surprises.
2. Currency Conversion
For international customers, presenting prices in their local currency can ease the purchasing decision. Implementing a currency conversion solution can ensure customers see accurate pricing during checkout, helping build trust and transparency.
3. Shipping Times and Tracking
Customers love clarity, so be upfront about estimated delivery times for international orders. Additionally, offering tracking numbers helps customers follow their shipments and reduces anxiety during the waiting period.
Enhancing Your WooCommerce Store with Aelia’s Blacklister Plugin
One essential tool for managing international shipping is the Aelia Blacklister for WooCommerce plugin. This powerful solution helps you manage shipping restrictions by blocking specific countries or regions from accessing your store. Whether it’s due to legal issues, shipping limitations, or other factors, Blacklister ensures you’re not wasting time or resources fulfilling orders to places you can’t ship to.
The Blacklister plugin also integrates well with your overall international shipping strategy, giving you control over where you want to ship and making it easier to manage logistics.
